Microsoft Windows and UForge
Within UForge, Microsoft Windows is treated differently from other Linux/UNIX operating systems. In fact, Windows is not bundled with packages. Consequently, it is not possible to create standard (package based) OS Profile as for all the other supported distributions.
Instead, UForge uses a Golden Image as a profile. A Golden Image is an image that has been by the customer (see Creating a Golden Image) that contains the basic installation of the Windows version and some extra files. You can generate Golden Images at any time.
A Golden Image can be between 5 to 10 Gb, depending on the selected version.
You will need Golden Images to create Windows appliance templates. If you want to incorporate a Windows update, then you need to create and install a new set of Golden Images. You can create Golden Images yourself.
Note
A good knowledge of Microsoft Windows is required to create your own Golden Images.
Generating all the profiles available (in one language) takes roughly 4 to 7 hours depending on the machine/network performance. You can regenerate Golden Images as often as you like, based on your individual needs. However, it is recommended that you regenerate only for specific updates—these updates will be in the Golden Image and you will not need to run package updates. When you generate a Golden Image the updates are the ones at the moment at which the Golden Image is generated.
Within UForge, the Golden Image used when you create appliances will be the last Golden Image created. In future releases, the different Golden Images will appear as Milestones.
Once the Golden Image is created, you will need to
- Save it to the proper location (as described in Storing Golden Images on the NAS).
- Store the golden images (all profiles in one language) as described in Storing Golden Images on the NAS. You will need about 40Gb of disk space on the UForge NAS.
- Add the Golden Image to your UForge AppCenter, as described in Adding a Golden Image to UForge AppCenter.
Supported Microsoft Windows Versions
UForge supports Microsoft Windows Server 2008 R2 (this distribution is only 64 bits), 2012 and 2012R2.
Microsoft delivers 4 versions:
- DataCenter
- Standard
- WebServer
- Enterprise
For each version, there is a Full release and a Core release (without a Desktop).
These versions are available in French, English and Japanese. Unfortunately, one version of Microsoft Windows can NOT support multiple languages.
Restrictions
The following UForge features are not supported with appliances based on Microsoft Windows:
- Package selection at the OS level (however, users can add software via MySoftware or Projects)
- Windows migration possible as blackbox only
- Windows ISO format not supported
Using Microsoft Windows Key Mechanism
Microsoft Windows Operating System requires a key validation. UForge generates images without a key in it. Users have 30 days to enter their key once the Appliance is booted.
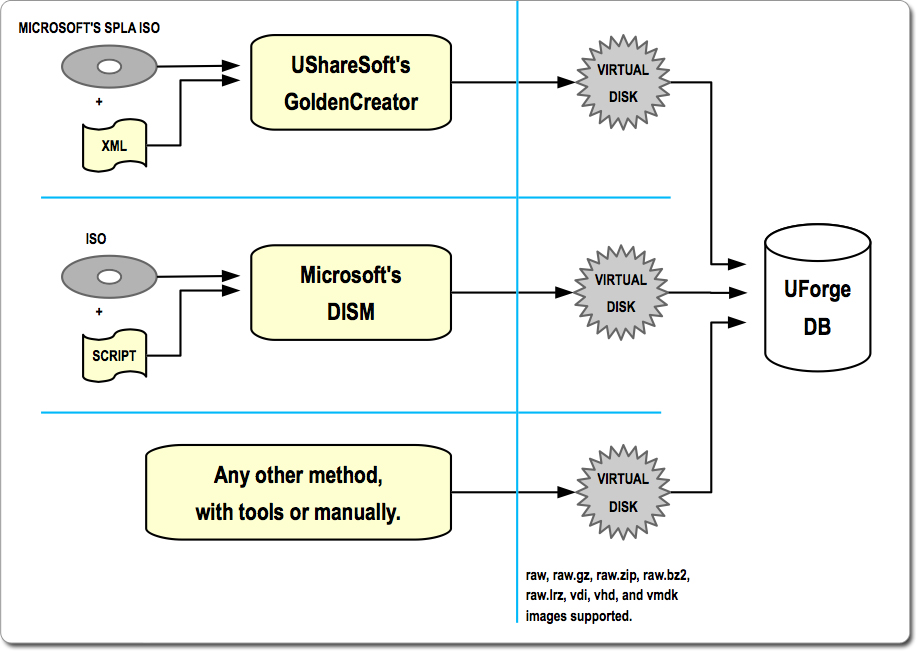
Workflow for Windows Golden Image
The following graphic illustrates the workflow to obtain and install Windows Golden Images.
First Installation of Microsoft Windows
To install Microsoft Windows, follow the instructions below. This example is for Microsoft Windows Server 2008R2. If you wish to install for Microsoft Windows Server 2012 or 2012 R2, replace the string Server2008R2 with the version you want to install in all commands below.
First population of Windows:
$ org os add --name Windows --arch x86_64 --version Server2008R2Activate Windows Server2008R2 inside the UForge organization:
$ org os enable --name Windows --arch x86_64 --version Server2008R2Activate Windows Server2008R2 for root user (and potentially other preexisting users):
$ user os enable --name Windows --arch x86_64 --version Server2008R2 --account root
$ user os enable --name Windows --arch x86_64 --version Server2008R2 --account <OTHER_USER_NAME>
Note
UForge does not manage Windows updates as it does for Linux. Each time you want to have an update for Windows, you will need to create and install a new set of Golden Images.
Listing Existing Golden Images
In order to view a list of existing golden images installed on your UForge run:
$ org golden list --name Windows --arch x86_64 --version Server2008R2
Creating a Golden Image
To create a new Golden Image, you will need to:
Ensure the following two partitions exist. These partitions are created by default during a standard Windows installation. There must be no other partitions.
- System partition. This one is hidden, created automatically during installation of Windows Server.
- Drive
C:The following Windows features must be installed as Administrator:
- ServerCore-WOW64
- NetFx2-ServerCore
- NetFx2-ServerCore-WOW64
- NetFx3ServerFeatures
- NetFx3
To install these features, you can either go to the
Control PanelunderPrograms and Featuresor open a command prompt window as Administrator and run the following Windows commands:$ start /w dism /online /enable-feature /all /featurename:ServerCore-WOW64 $ start /w dism /online /enable-feature /all /featurename:NetFx2-ServerCore $ start /w dism /online /enable-feature /all /featurename:NetFx2-ServerCore-WOW64 $ start /w dism /online /enable-feature /all /featurename:NetFx3ServerFeatures $ start /w dism /online /enable-feature /all /featurename:NetFx3 $ start /w dism /online /enable-feature /all /featurename:NetFx3-ServerCore $ start /w dism /online /enable-feature /all /featurename:NetFx3-ServerCore-WOW64Note
If any of the above commands fail with an error indicating that the feature is non-existant, ignore the error and continue.
Install gtk-sharp-2.12.10.win32.msi.
- You can download it from http://download.mono-project.com/gtk-sharp/gtk-sharp-2.12.10.win32.msi.old
- Rename gtk-sharp-2.12.10.win32.msi.old to gtk-sharp-2.12.10.win32.msi
- Run the following command: gtk-sharp-2.12.10.win32.msi
We recommend that you run Windows Update to ensure that the latest updates are pre-installed in the Golden Image.
Optionally, you can also add the following customizations:
- Modify the registry
- Extra software installation
- User creation
Optionally, you can free several gigabytes of space by cleaning up windows updates installers.
Warning
After this optimization you may not be able to uninstall some of the Windows updates.
$ dism /online /Cleanup-Image /StartComponentCleanup /ResetBaseIf you have Service Packs installed, you can free up some space by executing the following command, which will merge the Service Pack installer to the operating system.
Warning
After this optimization, you will not be able to uninstall the Service Pack.
$ dism /online /Cleanup-Image /SPSupersededYou can optionally perform optimizations in size for the compressed raw virtual disk image. To do so, you must:
Before the sysprep step, use the Microsoft Sysinternals tool called sdelete.exe (or sdelete64.exe) with option
-zin a command line for all partitions, example:$ sdelete -z C:After finishing the golden image (after sysprep at the last step), but before compressing the .raw with gzip or lrzip, perform the following command to the .raw virtual disk image:
$ cp --sparse=always image.raw newimage.rawThis will copy the image file but skip the zeros, so the .raw image will be as sparse as possible, also helping the compression program.
$ mv -f newimage.raw image.rawOpen a command prompt window as an administrator and go to the
%WINDIR%\\system32\sysprepdirectory. Then run:$ sysprep.exe /generalize /oobe /shutdownNote
This will shutdown the machine. Do not boot the machine again!
You can now compress the golden images by running:
$ gzip image.raw
You can now save you golden image on the NAS.
Storing Golden Images on the NAS
Each time you have a new Golden Image, you need to store them in the right NAS location.
Note
To store the golden images (all profiles in one language) you will need about 40Gb of disk space on the UForge NAS.
The golden images should be stored in:
Base dir = Windows/releases/Server2008R2/x86_64/
The path is:
{Language}/{Edition}/{Type}/{generation date}(YYYY-MM-DD)/goldenImagePathCompressedInGz
For instance, below is a sample hierarchy:
Windows/ Windows/releases Windows/releases/Server2008R2 Windows/releases/Server2008R2/x86_64 Windows/releases/Server2008R2/x86_64/English Windows/releases/Server2008R2/x86_64/English/Standard Windows/releases/Server2008R2/x86_64/English/Standard/Core Windows/releases/Server2008R2/x86_64/English/Standard/Core/2012-10-19 Windows/releases/Server2008R2/x86_64/English/Standard/Core/2012-10-19/Windows_2008R2_Standard_Core_2012-10-19.raw.gz Windows/releases/Server2008R2/x86_64/English/Standard/Full Windows/releases/Server2008R2/x86_64/English/Standard/Full/2012-10-19 Windows/releases/Server2008R2/x86_64/English/Standard/Full/2012-10-19/Windows_2008R2_Standard_Full_2012-10-19.raw.gz Windows/releases/Server2008R2/x86_64/English/WebServer Windows/releases/Server2008R2/x86_64/English/WebServer/Core Windows/releases/Server2008R2/x86_64/English/WebServer/Core/2012-10-19 Windows/releases/Server2008R2/x86_64/English/WebServer/Core/2012-10-19/Windows_2008R2_WebServer_Core_2012-10-19.raw.gz Windows/releases/Server2008R2/x86_64/English/WebServer/Full Windows/releases/Server2008R2/x86_64/English/WebServer/Full/2012-10-19 Windows/releases/Server2008R2/x86_64/English/WebServer/Full/2012-10-19/Windows_2008R2_WebServer_Full_2012-10-19.raw.gz Windows/releases/Server2008R2/x86_64/English/Enterprise Windows/releases/Server2008R2/x86_64/English/Enterprise/Core Windows/releases/Server2008R2/x86_64/English/Enterprise/Core/2012-10-19 Windows/releases/Server2008R2/x86_64/English/Enterprise/Core/2012-10-19/Windows_2008R2_Enterprise_Core_2012-10-19.raw.gz Windows/releases/Server2008R2/x86_64/English/Enterprise/Full Windows/releases/Server2008R2/x86_64/English/Enterprise/Full/2012-10-19 Windows/releases/Server2008R2/x86_64/English/Enterprise/Full/2012-10-19/Windows_2008R2_Enterprise_Full_2012-10-19.raw.gz Windows/releases/Server2008R2/x86_64/English/Datacenter Windows/releases/Server2008R2/x86_64/English/Datacenter/Core Windows/releases/Server2008R2/x86_64/English/Datacenter/Core/2012-10-19 Windows/releases/Server2008R2/x86_64/English/Datacenter/Core/2012-10-19/Windows_2008R2_Datacenter_Core_2012-10-19.raw.gz Windows/releases/Server2008R2/x86_64/English/Datacenter/Full Windows/releases/Server2008R2/x86_64/English/Datacenter/Full/2012-10-19 Windows/releases/Server2008R2/x86_64/English/Datacenter/Full/2012-10-19/Windows_2008R2_Datacenter_Full_2012-10-19.raw.gz
Adding a Golden Image to UForge AppCenter
Once you have your Golden Image, you need to add it to your UForge AppCenter in order to be able to use the Windows version to create appliance templates. Your golden image must be in one of the following formats:
- raw.gz
- raw.zip
- raw.bz2
- raw.lrz
- vdi
- vhd
- vmdk
To add your Golden Image to UForge:
Copy the image to:
$ /tmp/DISTROS/Windows/releases/<windows os version>/x86_64/<language>/<my custom profile name>/<Core|Full>/<YYYY-MM-DD>/golden.xxx

For example: /tmp/DISTROS/Windows/releases/Server2008R2/x86_64/English/MyProfile/Core/2014- 04-28/Windows_2008R2_English_Datacenter_Core_2014-04-28.raw.gz

Note:

        * File and directory ownership should be ``tomcat:tomcat``.
        * Permissions should be readable for all users
        * Disk name must be unique in the ``/tmp/DISTORS/Windows`` file tree
You must ensure that the Windows distribution exists on your UForge AppCenter. If it does not, run:
$ uforge org os add --name Windows --arch x86_64 --version Server2008R2In order to add the new golden image to the distribution, run:
$ uforge org golden create --name Windows --arch x86_64 --version Server2008R2 --edition Standard --goldenDate 2014-04-28 --language English --type Full --goldenName Windows_2008R2_English_Standard_Full_2014-04-28.raw.gzNote
The parameters set when running
org golden createshould correspond to the path on the NAS, that is: {Language}/{Edition}/{Type}/{generation date}(YYYY-MM-DD)/goldenImagePathCompressedInGzFor example to install the golden image saved to the following path:
Windows/releases/Server2008R2/x86_64/English/Standard/Full/2012-10-19/Windows_2008R2_Standard_Full_2012-10-19.raw.gz, you need to run:$ org golden create --name Windows --arch x86_64 --version Server2008R2 --language English --edition Standard --type Full --goldenDate 2012-10-19 --goldenName Windows_2008R2_Standard_Full_2012-10-19.raw.gz