Managing the Project Catalog
A Project Catalog is a collection of software components that are available for UForge users to use when building their server templates. A project is one software component. A project includes files, binaries or native packages and may have an EULA (End User License Agreement).
Each organization within the UForge platform has a project catalog, and each member of the organization has access to the project catalog, allowing them to add any of the projects to their server templates. The contents of the project catalog, however, can only be updated and managed by the administrators of the organization where the project catalog belongs. An organization administrator can:
- add new projects to the catalog
- update existing projects to the catalog
- mark a project obsolete.
- delete a project.
You can also create custom OS profiles to include specific packages to an existing (standard) OS profile. See Creating Custom OS Profiles.
Adding a Project
To add a new project:
Under the Administration tab, click
Projects.If you are an administrator to more than one organization, then you can choose the organization to administer from the drop-down menu.
Projects are associated with a specific version of operating system. Click on the operating system you want to create a project for. This will provide the current list of projects this operating system has.
Note
If a project supports more than one version of operating system, then you must re-create a new project for each operating system version. To automate the way projects are added and maintained, use the UForge APIs (for example to add the same project to multiple operating systems).
Click the
createbutton in theProjectssection of the page.Fill in the mandatory information including:
- Name of the project
- Version of the project
- Project tag
- Category
- License type. Note if the software has a proprietary license, then choose
Custom. This allows you to upload a custom license- Company information. All previous custom companies registered for projects are provided in the list. If the company of the project does not yet exist, choose any existing company and edit it afterwards.
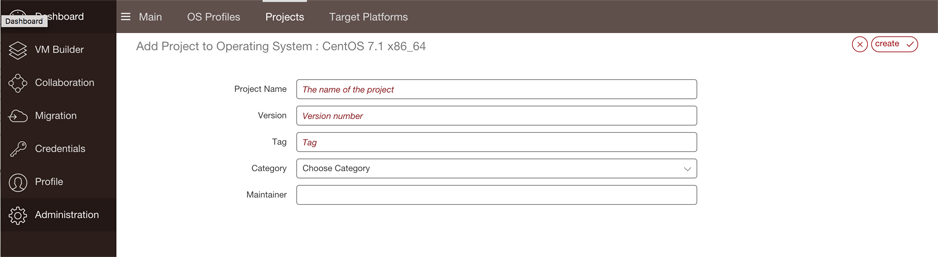
Click
create.Enter a description.
Optionally, you can add the following meta-data:
- a logo for the project
- website information of where the project came from
- in the case of a Custom license, upload the license file (HTML or text files)
- set the default install path
You can upload the software files that are required by the project. Files can be binaries, text files, jar files etc. The administrator can also choose native packages from the operating system itself to be part of the project.
Click
Save.
Updating a Project
UForge provides the default projects for the OSes provided.
To modify the projects:
- Under the
Administrationtab, clickProjects.- If you are an administrator to more than one organization, then you can choose the organization to administer from the drop-down menu.
- Projects are associated with a specific version of operating system. Click on the operating system you want to modify. You will see a list of all the projects that are part of the OS.
- Click on the project you wish to edit. At this stage you can change any of the meta-data and files uploaded.
Deleting a Project
When deleting projects from the catalog, it is important to understand that you should check that no appliance templates are using the project you wish to delete (otherwise this may break generating a machine image for the appliance template).
Note
If an appliance template is still using a project, you can remove the project from the catalog by marking it as obsolete. This does not delete the project contents, however users cannot use the project for new appliance templates. See Marking a Project as Obsolete for more information.
To delete the project:
Under the
Administrationtab, clickProjects.If you are an administrator to more than one organization, then you can choose the organization to administer from the drop-down menu.
Projects are associated with a specific version of operating system. Click on the operating system you want to modify. You will see a list of all the projects that are part of the OS.
To delete the project can either:
click on the
deleteicon at the extreme right-hand side in the table for the project item.
or
click on the project item to edit it, then click on the
deleteicon at the top right-hand side of the project edit page.
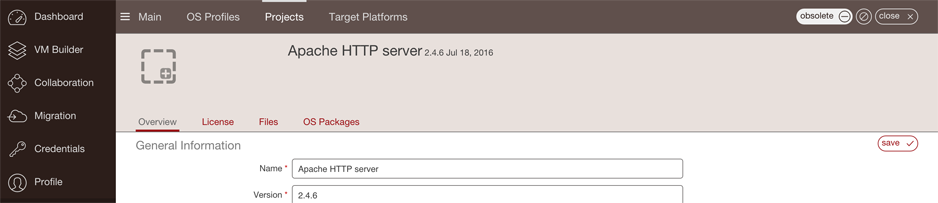
Marking a Project as Obsolete
Another way to remove a project from the project catalog is to mark the project as obsolete. This ensures that any existing templates that use the project can still generate images correctly, however the project is no longer accessible in the catalog for new appliance templates.
To mark a project as obsolete:
- Under the
Administrationtab, clickProjects.- If you are an administrator to more than one organization, then you can choose the organization to administer from the drop-down menu.
- Projects are associated with a specific version of operating system. Click on the operating system you want to modify. You will see a list of all the projects that are part of the OS.
- Click on the project to edit it.
- Click on the
obsoleteicon at the top right-hand side of the project edit page.