Scanning the Source System
The first step in migrating your system is running a scan of the target system. This identifies the meta-data of every file and package that makes up the running workload.
You must have root access on the target system in order to complete the scan, as you will need to copy and run a binary file on the target system.
Warning
UForge AppCenter does not support multi-kernels. When scanning a machine with more than one kernel, only the kernel running will be scanned and imported.
When you run a scan of a system, UForge AppCenter will differentiate between “known” data (OS packages and files that are already part of UForge AppCenter repository) and files that are “unknown”. UForge AppCenter does not support more than 10 Gb of compressed “unknown” data.
Warning
Any pre-install or post-install scripts on the system you are about to scan should only use ascii character set. Otherwise UForge AppCenter will return a scan error: DB Error – invalid characters.
Recommendations pre-scan:
- Pre-install or post-install scripts on the system you are about to scan should only use ascii character set
- Custom packages on the live system to be scanned should not contain references to package dependencies as relative path. They should be expressed as absolute paths.
- If custom packages are installed using
--nodepsflag, the scan process will not detect these packages. When carrying out white box migration, UForge AppCenter will check for these dependencies. If they are custom packages that are not on the live system, the generation will fail. Therefore, it is recommended to provide a custom repository with all the necessary custom packages. Otherwise, they can be added after the scan to the appliance template inMy software.
Scanning a Linux Machine
Warning
When scanning a Linux machine, you have to check whether the licenses of OS and software which the source machine contains allow you to use them on the destination server which you are migrating to. For more detail, refer to Notes on Licensing.
To carry out a scan, go to the Migration tab:
Click on
scanin the top right.Enter a name for the scan of the target system you want to migrate.
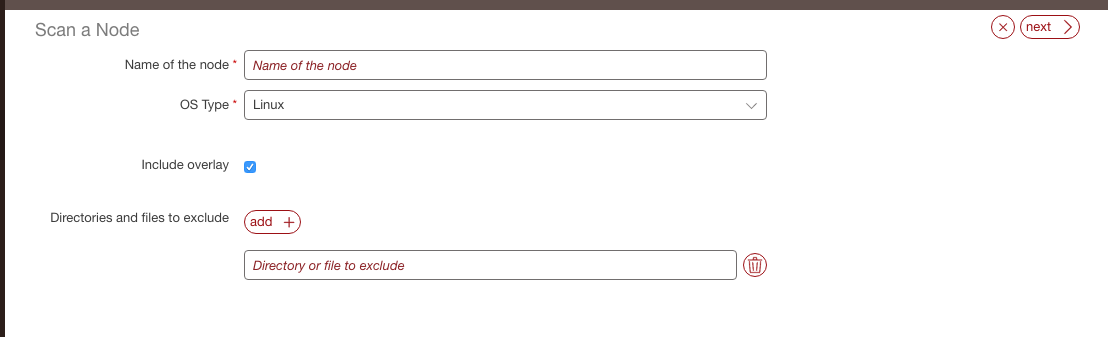
Select
Linuxfrom the drop-down menu.Leave
Include overlayselected if you want to run a scan with overlay. This will return all the packages, files and configuration information of the source machine.If you want to exclude certain directories or files from the scan then click
addand enter the directory path or full pathname of the file.Click
Next. Follow the instructions on the UForge AppCenter GUI.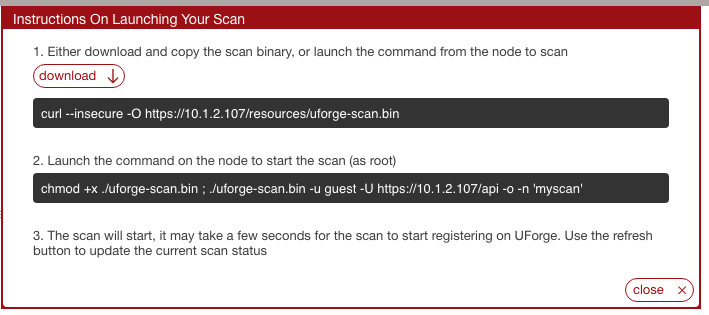
Download binary locally by clicking
Download.Copy the binary on the target environment you want to migrate.
Open a terminal window and login to the target environment.
Run the scan command on the running target environment to start a scan of the system you want to migrate. Note the
-ooption in the scan command identifies that you will launch a scan with overlay. The binary identifies the packages, files and custom files on the system.By default the scan data will be saved in
/tmp. You can modify the directory where the data will be saved using the-toption in order to ensure that there is enough space to save the scan data.You can also use API keys to run the command. In this case, in the command you copied, remove the password and enter the API keys using
-aoption for the public key and-soption for the secret key. For example:./uforge-scan.[bin/exe] -u <username> -a <public-key> -s <secret-key> -U http://ip:port/ufws -n 'Test_scan'A report is sent to UForge AppCenter which can be used for migration. To view the progress, go back to the
Migrationtab and clickok.Note
The duration of the scan depends on:
- the power of the machine in the target environment,
- the complexity of the target environment OS (number of packages installed),
- the network bandwidth between the target environment and UForge.
Scans of typical simple target environments can last about 5 to 15 minutes. In the case of larger and more complex target environments, together with poorer bandwidth, one can experience durations of up to one hour.
- To view the details of a scan, click on the scan and refer to Viewing a Scan.
Note
Image generation will fail when migrating if the source server has the same LVM volume group name as the UForge server’s one. It will fail also if the volume group name set in the Partitioning Table is the same as the name of LVM volume group in UForge server.
Scanning a Microsoft Windows Machine
Warning
When scanning a Microsoft Windows machine, you must acquire Windows licenses in order to handle Windows OS in UForge and confirm usage conditions of cloud provider and virtualization software which you scan and migrate to.
To carry out a scan, go to the Migration tab:
Click on
scanin the top right.Enter a name for the scan of the target system you want to migrate.
Select
Windowsfrom the drop-down menu and click next.Select if you want to use the graphical user interface or the command line. Follow the instructions on the pop-up to download the scan binary.
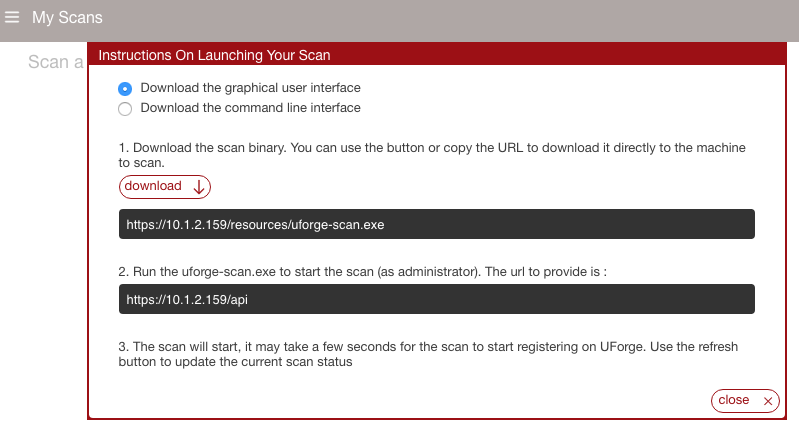
You can then launch the scan. The following image illustrates a windows scan with all of the possible options checked. They are described in the following steps.
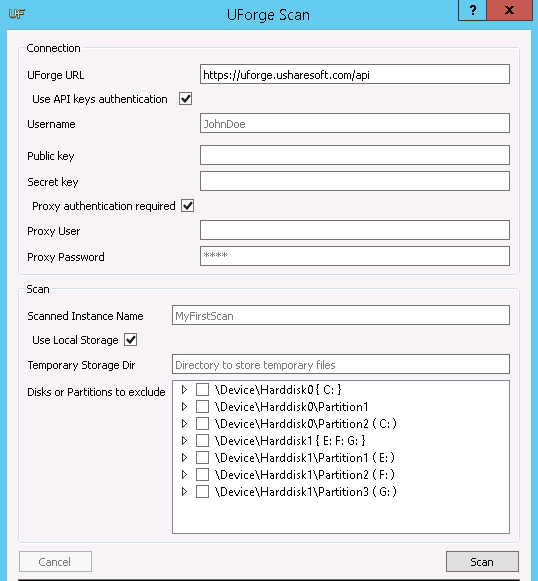
Optionally you can use API keys. In this case, check
Use API keys authenticationand enter the public and secret key information.If you want to set up a proxy, check
Proxy authentication requiredand enter the proxy information.Optionally you can select
Use local storage. This means that the scan will be not be done in streaming but in 2 phases. First the data will be stored on a temporary storage drive during the scan process. This temporary storage can be a local directory or a virtual space on the network. It must be at least half the size of the machine you want to scan.Note
If you are using local storage you will have to launch a script at the end to upload the archive to UForge AppCenter later.
- If you want to exclude certain directories or files from the scan then click
addand enter the directory path or full pathname of the file.- Click
scanto launch the scan. A report is sent to UForge AppCenter which can be used for migration. To view the progress, go back to theMigrationtab and clickok.- To view the details of a scan, click on the scan and refer to Viewing a Scan.