Using the REST API
UForge API is a RESTful resource.
The UForge API follows the design principles of Representational State Transfer (REST). UForge platform provides a set of resources (the API), each of which is referenced with a global identifier (URI). In order to manipulate these resources, clients communicate via the standard HTTP(S) protocol and exchange representations of these resources in a specific format. The documentation notes which formats are available for each method. The API presently supports XML and JSON. To get the results in the format of your choice, the Accept-Type header attribute is used in the request.
To make the UForge API easier to use, UForge has a Java SDK and Python SDK. You can create the API for other languages.
Communication with UForge is done via HTTP(S). For security reasons it is recommended to use HTTPS, however you may submit HTTP requests for debugging purposes.
- GET requests retrieve data
- POST requests create data
- PUT requests modify existing data
- DELETE request destroy existing data
API methods that require a particular HTTP method will return an error if you do not make your request with the correct one. All HTTP methods return codified response codes.
For a complete list of all the REST interface, refer to the REST APIs Reference documentation.
Response & Error Codes
The UForge API returns typical HTTP status codes for every request received. HTTP status codes in the 200 range mean that the request was successful, while the 400 and 500 range indicates an error. The status codes in the 300 range are reserved for redirection.
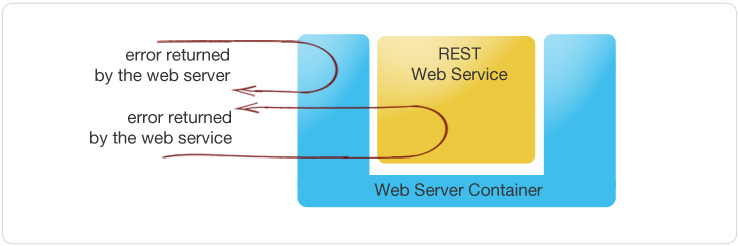
Some of the error codes are returned by the web server container, while all the other response codes are returned by the UForge REST web service. Errors returned by the UForge REST web service may include a more detailed error message indicating why the request failed.
Success Codes
The following codes indicate a successful connection. The response may also include a body section providing the requested information. This information is in a MIME format specified as acceptable in the request.
200 OK: Success. The request was fulfilled.201 Created: Following a POST command, a new resource has been created. The new resource URI is included in the response.204 No Response: Server has received the request but there is no information to send back. This is usually the case in a DELETE command, where a resource has been deleted304 Not Modified: Used when a client does a Conditional GET Request. If the document has not been modified since the date and time specified in If-Modified-Since field, the server responds with a 304 status code and does not send the document body to the client. The purpose of this feature is to allow efficient updates of local cache information (including relevant meta-information) without requiring the overhead of multiple HTTP requests (e.g. a HEAD followed by a GET) and minimizing the transmission of information already known by the requesting client (usually a caching proxy).
Error Codes
The 4xx codes are intended for cases where the client seems to have erred, and the 5xx codes for cases where the server identifies that the server has erred. It is impossible to distinguish these cases in general, so the difference is only informational. The UForge platform will attempt to provide a detailed error message to help the client diagnose the problem.
400 Bad Request: The request has bad syntax or was inherently impossible to satisfy.401 Unauthorized: The request did not provide an acceptable authorization parameter. The client should retry the request with a suitable Authorization header.403 Forbidden: The client does not have the privileges to access this resource. Authorization will not help.404 Not found: The server did not find anything matching the resource provided in the request.409 Conflict: Following a POST command, if the resource being created already exists.415 Unsupported Media Type: The server refuses to service the request because the entity of the request is in a format not supported by the requested resource for the requested method.500 Internal Error: The server encountered an unexpected condition which prevented it from fulfilling the request.502 Bad Gateway: UForge is down or being upgraded.503 Service Unavailable: UForge is overloaded with requests. Try again later.
Sending a Request
The UForge Platform Services are all RESTful services, where clients communicate via the standard HTTP(S) protocol. That means you can easily construct request URLs that will work on the command line and in your code.
All UForge requests (with some exceptions) require authentication information as part of the request.
The UForge REST API uses a public and secret API key pair for authenticating each request. The public key is inserted as a query in the request URI. The secret key is then used to encode the entire URI to create a signature using HMAC_SHA1. This signature is then added to the end of the request URI.
Note that you can use Basic Authentication by adding an extra HTTP header Authorization:Basic username:password. However, this is less secure. We recommend this only be used on local area networks for instance.
All request URLs start with the hostname of where UForge is running, the port where UForge is listening for incoming requests, the service name and version number. This is known as the BASE URL. Such request URLs resemble the following sample:
https://myuforge.example.com:443/api
Even though UForge accepts HTTP requests, it is highly recommended for security reasons that HTTPS requests be used. HTTP requests should only be used for debugging purposes. Sensitive information will be exposed using HTTP.
The Request Headers
UForge expects certain headers containing authentication information be present as part of the URL request. UForge also accepts other header information, for example, to specify response content type and caching.
Request Example
The following is an example of a request sent to a UForge platform with hostname 10.0.0.20 using cURL to get the user myUser. Note that the response body (the user information) has been omitted here for clarity:
    $ curl 'http://10.1.2.206/api/users/myUser?apiKey=XX8Bs2prKPdFrKH_i4rsW7WR0f4FQ05IO7A8vuQUoNDino-7513mmEDecIAzpeMwWXZvnyZ6W0bJTKBwwc&signature=3qD1oxLwOI321BJ1pDZ6Dzmqbac%3D' -H "Accept: application/xml" -v

    *   Trying 10.1.2.206...
    * Connected to 10.1.2.206 (10.1.2.206) port 80 (#0)
    > GET /api/users/guest HTTP/1.1
    > Host: 10.1.2.206
    > User-Agent: curl/7.42.1
    > Accept: application/xml

    < HTTP/1.1 200 OK
< Date: Mon, 29 May 2017 14:28:19 GMT
    < Server: Apache
    < Last-Modified: Mon, 29 May 2017 08:49:24 GMT
    < ETag: "837201f6b809de2aeedca4814e7a85e5"
    < Content-Language: en
    < version: 3.7.4-SNAPSHOT
    < Content-Type: application/json
    < Set-Cookie: JSESSIONID=708921B1F0C2AFA55262119F5E321FAF; Path=/ufws/; HttpOnly;HttpOnly;Secure
    < Connection: close
    < Transfer-Encoding: chunked
The example illustrates the following:
- a
GETrequest is sent (cURL by default uses GET) on the resource:/users/myUser - an API key is used in this case for authorization
- the
Accept headeris being used to request that the response be sent inXML. - the response header includes
ETagandLast-Modifiedallowing cache validation and a conditional GET request.
Response Body Types
The API reponse types supported are XML or JSON. The Accept header is used in the request to determine which response type you would like.
- For JSON, use:
-H "Accept: application/json" - For XML, use:
-H "Accept: application/xml"
If no accept header is used, then XML is returned by default.
For example, to retrieve the user information in JSON, the following request is used:
$ curl "http://10.1.2.206/api/users/guest" -X GET -u "guest:guest_password" -H "Accept: application/json"
Note
This example uses basic authentication (which is not advised). Furthermore, the response body i.e. the user information has been omitted here for clarity.
Using the API Keys
To use the UForge AppCenter APIs, it is recommended to use a public and secret API key as part of the request. This allows UForge AppCenter to correctly authenticate and authorize the request. API key pairs are managed on the My Accounts page under API Key. If you cannot see this tab, then you do not have the right to access UForge via the APIs. Contact your administrator for an initial API key pair.
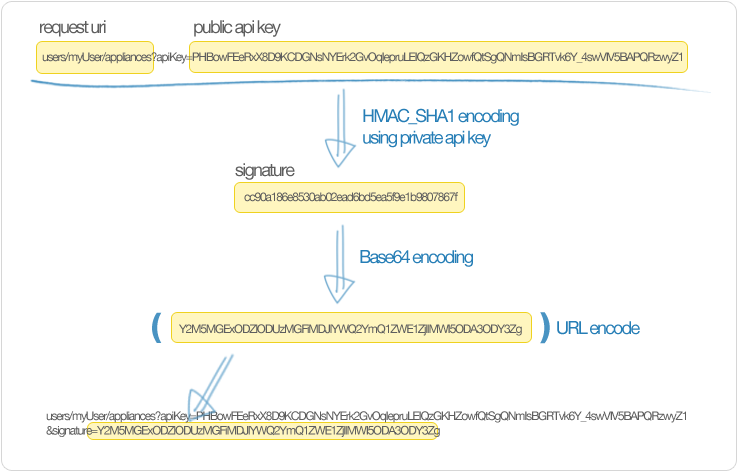
The API keys are used inside and to sign each request URI to the UForge platform. The creation of a properly signed request URI is done in 5 steps:
- Add the public API key to the end of the request URI with the query parameter
apiKey. - Encrypt the request URI using
HMAC_SHA1with your secret API key to create a signature string. - Encode the signature string using
Base64. - URL encode the signature string.
- Add the signature to the end of the request URI created in step 1 with the query parameter
signature.
Query Parameters
Certain resources within the UForge AppCenter API allow query parameters (or query strings) as part of the request URI. This allows you to pass extra parameters during search requests or to restrict the response data.
To pass a query parameter in a URL, the question mark symbol (?) is used as a separator. For example:
http://server/uripath?query_string
The query string is composed of one or more field-value pairs, each separated by the equals symbol (=). The series of field pairs is separated by the ampersand symbol (&). For example:
http://server/uripath?field1=value1&field2=value2&field3=value3
REST API Examples
For clarity, the following examples use basic authentication to communicate with UForge. As this is an insecure request, this is not recommended for production use. All response information is also ommitted.
Retrieving a User
To retrieve a user’s profile information use the API resource:
-
GET /users/{uid} uid: is the login of the user
Example:
$ curl "http://10.1.2.206/api/users/guest" -X GET -H "Authorization: Basic guest:guest_password" -H "Accept: application/xml" | tidy -xml -indent -quiet
References:
- API reference: user_get
Adding a Cloud Account
A cloud account is used to register machine images that have been generated from an appliance template. To create a cloud account use the API resource:
-
POST /users/{uid}/accounts uid: is the login of the usercredAccount: CredAccount object you wish to create in the request body
Example:
$ curl "http://10.1.2.206/api/users/guest/accounts" -X POST -H "Authorization: Basic guest:guest_password" -H "Content-Type: application/xml" -H "Accept: application/xml" --data-binary "@representation.xml" | tidy -xml -indent -quiet
The representation.xml content (the request body):
<ns0:credAccount
    xmlns:ns0="http://www.usharesoft.com/uforge"
    xmlns:xsi="http://www.w3.org/2001/XMLSchema-instance"
    xsi:type="ns0:CredAccountOpenStack">
        <name>OpenStack John</name>
        <targetPlatform>
                <name>OpenStack</name>
                <type>openstack</type>
        </targetPlatform>
        <glanceUrl>http://ip:9292</glanceUrl>
        <keystoneUrl>http://ip:5000</keystoneUrl>
        <login>username</login>
        <password>password</password>
        <keystoneVersion>v3</keystoneVersion>
</ns0:credAccount>
References:
- API reference: cloudAccount_create
- CredAccount object
Get User Appliance Templates
To retrieve all the appliance templates for a particular user, use the following API resource:
-
GET /users/{uid}/appliances uid: is the login of the user
Example:
$ curl "http://10.1.2.206/api/users/guest/appliances" -X GET -H "Authorization: Basic guest:guest_password" -H "Accept: application/xml" | tidy -xml -indent -quiet
References:
- API resource: appliance_getAll
Create an Appliance Template
An appliance template contains the model of the software stack. The model includes all the operating system packages, middleware and application software for generating an image that can be provisioned on a virtual or cloud platform. To create an appliance template, you need to decide which operating system to build the template from, as well as the name and version.
To create an appliance template, the following API resource is used:
-
POST /users/{uid}/appliances uid: is the login of the userappliance: Appliance template object you wish to create in the request body
Example:
$ curl "http://10.1.2.206/api/users/guest/appliances" -X POST -H "Authorization: Basic guest:guest_password" -H "Content-Type: application/xml" -H "Accept: application/xml" --data-binary "@representation.xml" | tidy -xml -indent -quiet
The representation.xml content (the request body):
<ns0:appliance
    xmlns:ns0="http://www.usharesoft.com/uforge">
    <name>My Appliance</name>
    <version>1.0</version>
    <description>Appliance created with UForge API</description>
    <distributionUri>distributions/1</distributionUri>
    <orgUri>orgs/1</orgUri>
</ns0:appliance>
References:
- API resource: appliance_create
- Appliance object
Retrieve Available OS Profiles for an Operating System
Each appliance template can contain an OS profile. This lists the operating system packages for the appliance template. To help users to create OS profiles for an appliance template, each Operating System registered in the UForge platform has one or more base OS profiles (also known as OS templates) the user can choose from to get started. To retrieve the list of available OS profiles (or templates) for a particular operating system, use the following API resource:
-
GET /distributions/{id}/profiles id: is the id of the Operating System
Example:
$ curl "http://10.1.2.206/api/distributions/1/profiles" -X GET -H "Authorization: Basic guest:guest_password" -H "Accept: application/xml" | tidy -xml -indent -quiet
References:
- API resource osTemplate_getAll
- OS Profile object
Add an OS Profile to an Appliance Template
To add an OS profile (template) to an appliance template, first list all the OS profiles for the opertaing system (see Retrieve Available OS Profiles for an Operating System) and note the name and URI of the profile you would like to add. Then use the following API resource to add this OS profile:
-
POST /users/{uid}/appliances/{aid}/osprofile uid: is the login of the useraid: the id of the appliance template where the os profile will be addedOS Profile: OS profile to add to the appliance template (in the request body)
Example (Linux):
$ curl "http://10.1.2.206/api/appliances/1616/osprofile" -X POST -H "Authorization: Basic guest:guest_password" -H "Content-Type: application/xml" -H "Accept: application/xml" --data-binary "@distribprofile.xml" | tidy -xml -indent -quiet
The distribprofile.xml content (the request body):
<ns0:linuxProfile
    xmlns:ns0="http://www.usharesoft.com/uforge">
    <name>Minimal</name>
    <standardProfileUri>distribution/1/profiles/4</standardProfileUri>
</ns0:linuxProfile>
Example (Windows):
$ curl "http://10.1.2.206/api/appliances/1616/osprofile" -X POST -H "Authorization: Basic guest:guest_password" -H "Content-Type: application/xml" -H "Accept: application/xml" --data-binary "@distribprofile.xml" | tidy -xml -indent -quiet
The distribprofile.xml content (the request body):
<ns0:windowsProfile
    xmlns:ns0="http://www.usharesoft.com/uforge">
    <name>Standard 2012 English with agent</name>
    <standardProfileUri>distribution/9/profiles/27</standardProfileUri>
</ns0:windowsProfile>
References:
Searching for Operating System Packages (Linux Only)
Registered Operating Systems in UForge have package repositories attached to them (Linux only). You can search for packages in these repositories. These packages can then be added to an appliance’s OS profile. To search for packages, the following API resource is used:
-
GET /distributions/{id}/pkgs id: is the id of the Operating System
This would retrieve all the packages for this operating system. To carry out a search, a search criteria is used. This is based on FIQL, allowing you to search for packages based on different attribute values (including names, dates etc).
Example (retrieving all packages with the name nginx):
$ curl "http://10.1.2.206/api/distributions/1/pkgs&query=(name=='*nginx*'" -X GET -H "Authorization: Basic guest:guest_password" -H "Accept: application/xml" | tidy -xml -indent -quiet
Note
Wildcards can be used in FIQL queries.
References:
- API resource osPkg_getAll
- Package object
Adding a Package to an Appliance’s OS Profile (Linux Only)
Once an Appliance Template has an OS profile, you can add or remove operating system packages to it. To add one or more packages, you will need the URI of the packages(s) you wish to add. You can search for packages to retrieve this information.
Use the following API resource to add or remove these packages to the OS profile of an appliance template:
-
PUT /users/{uid}/appliances/{aid}/osprofile/{osid}/pkgs uid: is the login of the useraid: the id of the appliance templateosid: the id of the os profile to which the packages should be added
Example:
$ curl "http://10.1.2.206/api/appliances/1616/osprofile/2040/pkgs" -X PUT -H "Authorization: Basic guest:guest_password" -H "Accept: application/xml" --data-binary "@pkg.xml | tidy -xml -indent -quiet
The pkg.xml content (the request body):
<ns0:packages xmlns:ns0="http://www.usharesoft.com/uforge">
    <addedPkgUris>
        <uri>distributions/1/pkgs/631993</uri>
    </addedPkgUris>
</ns0:packages>
Removing the same package, the pkg.xml content would be (the request body):
<ns0:packages xmlns:ns0="http://www.usharesoft.com/uforge">
    <deletedPkgUris>
        <uri>distributions/1/pkgs/631993</uri>
    </deletedPkgUris>
</ns0:packages>
References:
- API resource applianceOSProfilePkg_updateAll
- Package object
Adding Custom Software to an Appliance Template
Software components can also be added to an appliance template. This is done in four stages:
- A software component container is created. This is registered into your software library.
- Create a software artifact container. This is the meta-data container for an uploaded file.
- Upload the software files into this software artifact container.
- Add the software component to an appliance template. Note that this software component can be added to multiple appliance templates.
To create the software component container, use the following API resource:
-
POST /users/{uid}/mysoftware uid: is the login of the user
Example:
$ curl "http://10.1.2.206/api/users/guest" -X POST -H "Authorization: Basic guest:guest_password" -H "Accept: application/xml" --data-binary "@software.xml | tidy -xml -indent -quiet
The software.xml content (the request body):
<ns0:mySoftware xmlns:ns0="http://www.usharesoft.com/uforge">
    <name>Zabbix</name>
    <version>3.0.1</version>
</ns0:mySoftware>
Once created, note down the artifactsUri of this software component. This is the URI we need to use to register one or more artifact objects.
Now we can create an artifact container. To do this use the uri of the software component. The resource API is:
-
POST /users/{uid}/mysoftware/{msid}/artifacts uid: is the login of the usermsid: the id of the software component created
Example (uploading a RPM, but this can be any file type):
$ curl "http://10.1.2.206/api//users/guest/mysoftware/918/artifacts" -X POST -H "Authorization: Basic guest:guest_password" -H "Accept: application/xml" --data-binary "@artifact.xml | tidy -xml -indent -quiet
The artifact.xml content (the request body):
<ns0:softwareFile
    xmlns:ns0="http://www.usharesoft.com/uforge">
    <name>
        zabbix-release-3.0-1.el6.noarch.rpm
        </name>
    <fullName>
        zabbix-release-3.0-1.el6.noarch.rpm
        </fullName>
    <origName>
        zabbix-release-3.0-1.el6.noarch.rpm
        </origName>
    <subSoftwareArtifacts/>
</ns0:softwareFile>
Now you can upload the binary. Note down the binaryUri of the newly created artifact object. This is the resource uri you use to upload the file:
-
POST /users/{uid}/mysoftware/{msid}/artifacts/{said}/bin/{fileName} uid: is the login of the usermsid: the id of the software component createdsaid: the id of the software artifactfileName(optional): The filename to upload
Example (uploading a RPM, but this can be any file type):
$ curl "http://10.1.2.206/api/users/guest/mysoftware/918/artifacts/1078/bin/" -X POST -H "Authorization: Basic guest:guest_password" -H "Accept: application/xml" --data-binary "/path/to/file/zabbix-release-3.0-1.el6.noarch.rpm" | tidy -xml -indent -quiet
Finally you can now add this software component to an appliance template. The following resource API is used:
-
PUT /users/{uid}/appliances/{aid} uid: is the login of the useraid: the id of the appliance template
Example:
$ curl "http://10.1.2.206/api/users/guest/api/appliances/1616" -X PUT -H "Authorization: Basic guest:guest_password" -H "Accept: application/xml" --data-binary "@appliancesoftware.xml" | tidy -xml -indent -quiet
The appliancesoftware.xml content (the request body):
<ns0:appliance xmlns:ns0="http://www.usharesoft.com/uforge">
    <name>My Appliance</name>
    <version>1.0</version>
    <distributionUri>distributions/1</distributionUri>
    <orgUri>orgs/1</orgUri>
    <uri>users/guest/api/appliances/1616</uri>
    <mySoftwareList>
        <mySoftware>
            <name>Zabbix</name>
            <version>3.0.1</version>
            <uri>users/guest/mysoftware/918</uri>
        </mySoftware>
    </mySoftwareList>
</ns0:appliance>
References:
- Create software component resource mySoftware_create
- Create software artifact resource mySoftwareArtifact_add
- Upload a binary file mySoftwareArtifact_upload
- Add software component to an appliance template appliance_update
- Software Component object
- Software Artifact object
- Appliance object
Generate a Machine Image
Machine images can be generated from appliance templates by using the following API resource:
-
POST /users/{uid}/appliances/{aid}/images uid: is the login of the useraid: the id of the appliance template
Example (generating an OpenStack QCOW2 image):
$ curl "http://10.1.2.206/api/users/guest/api/appliances/1616/images" -X POST -H "Authorization: Basic guest:guest_password" -H "Accept: application/xml" --data-binary "@generateimage.xml" | tidy -xml -indent -quiet
The generateimage.xml content (the request body):
<ns0:image xmlns:ns0="http://www.usharesoft.com/uforge">
<compress>false</compress>
<targetFormat>
        <name>OpenStack QCOW2</name>
</targetFormat>
<installProfile>
        <memorySize>512</memorySize>
        <diskSize>2048</diskSize>
</installProfile>
</ns0:image>
References:
- Generate a machine image machineImage_generate
- Machine Image object
Publish/Register a Machine Image to a Cloud Environment
Once a machine image has been generated, for certain formats, this machine image can be published (also known as registered) to a corresponding Cloud environment.
To publish a machine image, the following API resource is used:
-
POST /users/{uid}/appliances/{aid}/images/{itid}/pimages uid: is the login of the useraid: the id of the appliance templateitid: the id of the generated machine image
Example (publishing to OpenStack):
$ curl "http://10.1.2.206/api/users/guest/api/appliances/1616/images/346/pimages" -X POST -H "Authorization: Basic guest:guest_password" -H "Accept: application/xml" --data-binary "@publishimage.xml" | tidy -xml -indent -quiet
The publishimage.xml content (the request body):
<ns0:publishImage xmlns:ns0="http://www.usharesoft.com/uforge"
xmlns:xsi="http://www.w3.org/2001/XMLSchema-instance"
xsi:type="ns0:PublishImageOpenStack">
        <applianceUri>users/guest/api/appliances/1616</applianceUri>
        <credAccount xsi:type="ns0:CredAccountOpenStack">
                <targetPlatform>
                        <name>openstack</name>
                </targetPlatform>
                <glanceUrl>http://ip:9292</glanceUrl>
                <keystoneUrl>http://ip:5000</keystoneUrl>
                <login>username</login>
                <password>password</password>
                <keystoneVersion>v3</keystoneVersion>
        </credAccount>
        <imageUri>users/guest/api/appliances/1616/images/346</imageUri>
        <keystoneDomain>Keystone Domain Example</keystoneDomain>
        <keystoneProject>Keystone Project Example</keystoneProject>
        <displayName>Machine Image Name Example</displayName>
        <publicImage>false</publicImage>
</ns0:publishImage>
References:
- Publish a machine image machineImage_publish
- Machine Image object
- Publish Machine Image object