Migrating Using Automatic Process
You can use the Migrations tab to complete a migration automatically. When you run an automatic migration, you cannot modify any of the elements of the system (this is also referred to as “black box migration”).
Note
The Migrations tab for automated migration is only supported for Linux and for the following target platforms: K5, Microsoft Azure, OpenStack, SUSE Cloud, VMware Vcenter.
Note
White box migration using the Migrations page is not currently possible. Refer to Scanning the Source System if you want to run a white box migration.
The automatic migration process includes the following steps:
- Scan the source machine.
- Generate a machine image from the scan result.
- Publish the generated machine image to the selected target environment.
Launching an Automatic Migration
Note
The Migrations tab for automated migration is only supported for Linux and for the following target platforms: K5, Microsoft Azure, OpenStack, SUSE Cloud, VMware Vcenter.
All pre-requisites listed for migration using a scan are also applicable to Migrations (refer to Migration Pre-requisites).
In order to run a migration:
- Go to the
Migrationstab.- Click on the
migratebutton on the top right.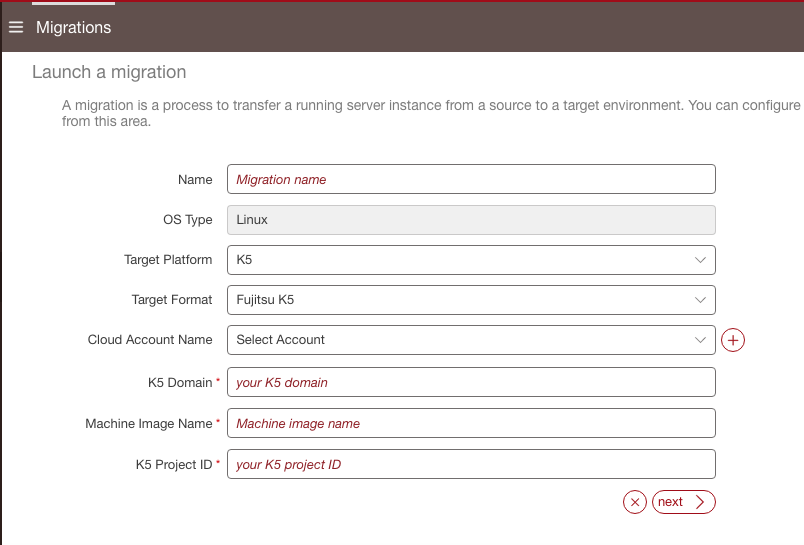
- Enter the name of your migration.
- From the drop-down menu select the target platform and type. Enter all other required fields, based on the target you have selected.
- Click
next.- Follow the instructions on the UForge AppCenter pop-up window.
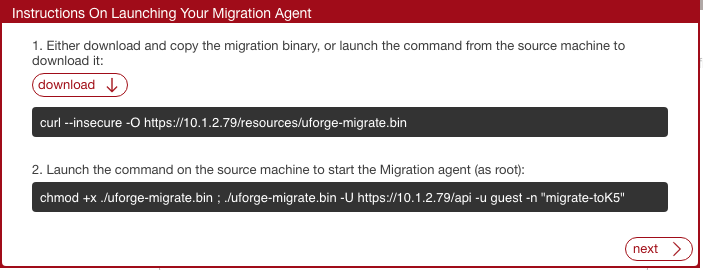
- Download binary locally by clicking
Download.- Copy the binary on the target environment you want to migrate.
- Open a terminal window and login to the target environment.
- Launch the migrate command on the running target environment to start the migration.
- Click
nextto view the migration status.- You can return to the
Migrationsmain page to view the status of your migrations.