Migration Process Overview
The five main steps of migration are as follows:
- The live system is “deep scanned”, detecting all the files and configuration information.
- The scan report and overlay is sent to UForge AppCenter.
- A machine image is generated from the scan. With
Re-platformyou can import the scan prior to machine image generation to change the content.- The machine image is uploaded and registered to the target environment.
- The registered machine image (also known as a template in cloud terminology) can be used to provision one or more instances. These instances have near identical content to the original live system.
Lift and Shiftautomatically executes steps 1, 2, 3 and 4. WithRe-platform, each of these steps are done manually, allowing the user to make the necessary changes after step 2.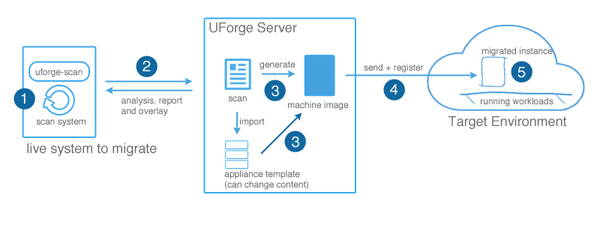
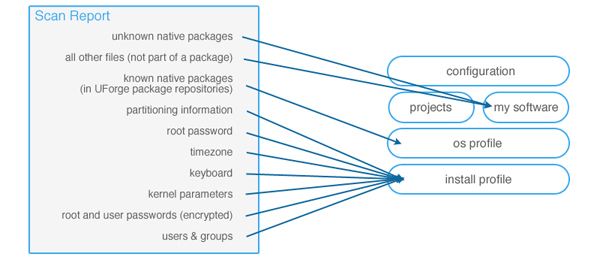
For both migration using Lift & Shift and Re-platform, UForge will scan the system you want to migrate and detect the following information:
- all the files and packages on the system (including configuration information). If you have selected a scan without overlay, then extra files and specific configuration information will be detected but will not be included in the report.
- root and user password (encrypted)
- timezone. As part of the generation, UForge will use the same timezone as the original system. UForge creates a symbolic link for
/etc/localtimethat point to the timezone set in/usr/share/zoneinfo.- keyboard settings
- kernel parameters
- users and groups
- filesystem layout (partitioning)
- SELinux settings are added to the
Install Profilefor CentOS, Red Hat and Scientific Linux only. Note the following:
- if SELinux is not activated on the scanned machine, it will not be activated on a VM generated from this scan.
- if SELinux is activated, it will be activated with the same rules, and the file system will be relabeled on the first boot because of
/.autorelabefile (and this file is deleted by SELinux once the relabel is done). Parameters from the/etc/selinux/configfile other than the SELinux mode are lost during the appliance import. If you want to modify some of these parameters you will need to add a MySoftware overlay with a/etc/selinux/configfile after the scan. Refer to Adding Software from Your Software Library.
Warning
All other information found in the scan is not used (reset) and the Install Profile default information is used. This includes:
- Networking information (IP address). In the case of Windows systems, or with NIC cards managed with NetworkManager, only the first NIC is taken into consideration. Note that if the first card is static, it will be changed to DHCP.
- SSH keys. You will need to manually add the ssh keys to the install profile.
Warning
Currently, UForge is not able to migrate the Yum repository GPG keys. This means that the user will have to accept the repository GPG key when the user installs or updates a package. The user will have to do this only once per repository.
Scan vs Scan with Overlay
You can select two types of scan: scan or scan with overlay. A scan will scan the target environment, but will only return the system packages and configuration known to UForge. A scan with overlay will include an overlay report which details all the extra files, packages or specific configuration. The overlay is all the things that are missing compared to a known state (a previous scan of a machine or the operating system native packages). This overlay is a standard tar archive. Once created, it is uploaded via HTTPS to the UForge AppCenter. The overlay is not built on the scan target but it is stream uploaded (faster and does not need any space on the scan target machine).
Note
Scan with overlay is only supported for Linux-based machines.
Warning
The following file types are not included in the scan overlay file:
- character device
- block device
- FIFO (named pipe)
- socket