Allowing Access to Image Formats
Image formats can be managed at the level of the organization or of the user.
An administrator who wants to add format rights to several users within an organization should create the formats at the level of the organization and then add them to a subscription profile. In this case, all new users created with the given subscription profile will have access to the formats.
In order to add a format you must create a target format and target platform.
Note
Without a target platform, the image cannot be published.
The administrator can add or remove image formats for a specific user account using the command-line interface, as described in Adding Formats to a Specific User.
Listing Formats
In UForge AppCenter, in order for a user to use a given format, a Target Format must be created and enabled for the given user and organization. Moreover, if the user wants to use a given Target Format for publishing an image, then a Target Platform must also be created, enabled and associated to the Target Format.
Note
As Target Platforms and Target Formats are created at the org level but then must be enabled for a given user, the list of available formats can differ for users of the same organization.
In order to list the formats available for a given org, use the command org targetformat list.
In order to list the formats available for a given user, use the command user targetformat list.
Adding Formats to an Organization Using the CLI
To add access to a format to an organization, you must:
Create a target format category using
uforge org category createCreate target format using
uforge org targetformat createIf the target format type is Cloud, create a target platform using
uforge org targetplatform create. This target platform is necessary to publish image generated with the target format. The target platform must have a cloud account associated.If the target format type is Cloud, add the target format to the target platform using
uforge org targetplatform addTargetFormat.(Optional) Add the format to a subscription profile using
uforge subscription targetFormat add. To add a target platform use either:
uforge subscription targetformat adduforge subscription targetplatform addNote
In order to apply the changes to all users (even those already created), use the option
--allusers. For example:$ uforge subscription targetformat add --targetformat ovf qcow2 vbox --allusers --name sub --url https://uforge.usharesoft.com:443 -u $ADMIN -p $PASS
- Enable the target format for the organization using
uforge org targetformat enable.- Enable the target format using
user targetformat enable.
Once the format is created in an organisation, you can either:
- add it to a group of users by adding it to the subscription profile (refer to Adding Formats Using Subscription Profile)
- add it to an individual user (refer to Adding Formats to a Specific User)
Adding Image Formats from the GUI
You can create your own image formats from the UForge GUI. To do so:
- Create a target platform.
- Create a target format.
Create a Target Platform
To create a target platform:
- From the
Administrationtab, click onTarget Platforms.- In the top right-hand, click on
new target platform.
The following window will appear:
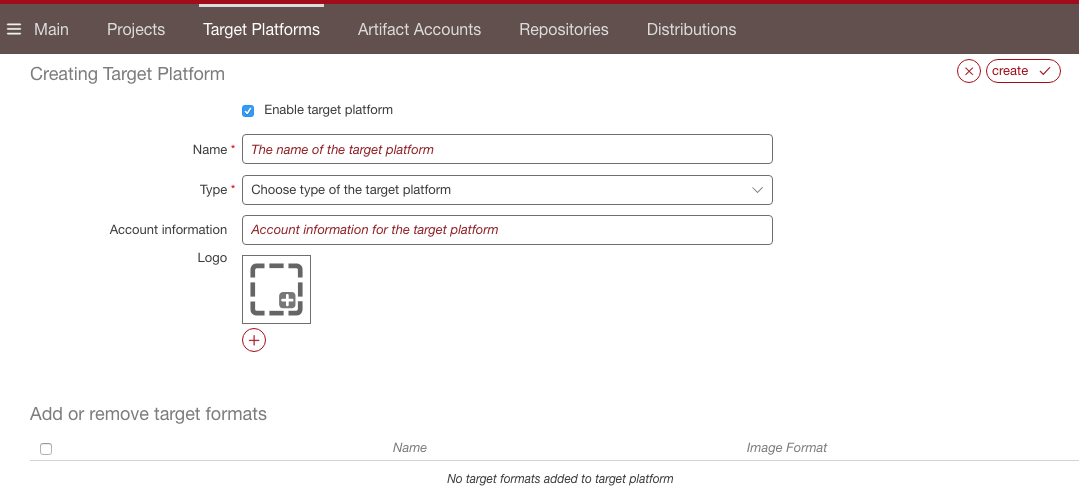
- Enter the name of the target platform.
- Select the type from the drop-down menu.
- Optionally you can click on the plus (+) to add a logo.
- If you do not want the target platform to be visible immediately, click on the check box next to
Enableto deselect.- You can add available target formats by selecting and clicking on the up arrow. The top list shows the formats that have been added to the target platform. To create new target formats, refer to the following section.
- Click
createin the top right to complete the creation.
Create a Target Format
To create a target format:
From the
Administrationtab, click onTarget Platforms.In the top right-hand, click on
new target format.
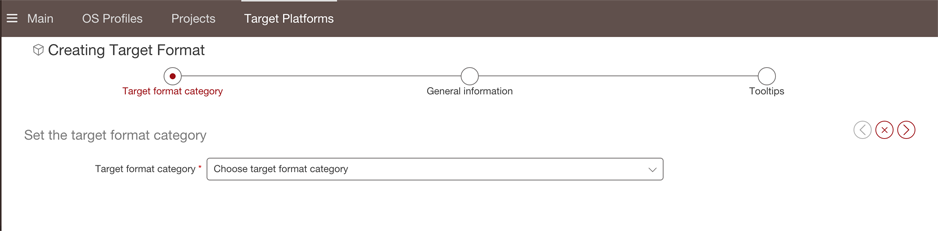
From the drop-down menu, choose the target format category and click the next arrow button.
Enter the name of the target format.
Select the type and the image format from the drop-down menus.
Optionally you can click on the plus (+) to add a logo.
If you do not want the target format to be visible immediately, click on the check box next to
Enableto deselect.On the
Tooltipspage enter the Credentials, image and publish information.On the
Target Platformspage you can attach your target format to a target platform. To add the target format to a target platform, select the target platform from the bottom table and click the up arrow. Your target format will be attached to all the target platforms listed in the top table.Click next to complete.
Opening Ports for Publication to Specific Formats
Depending on the target format your users will have access to, you may have to open specific ports.
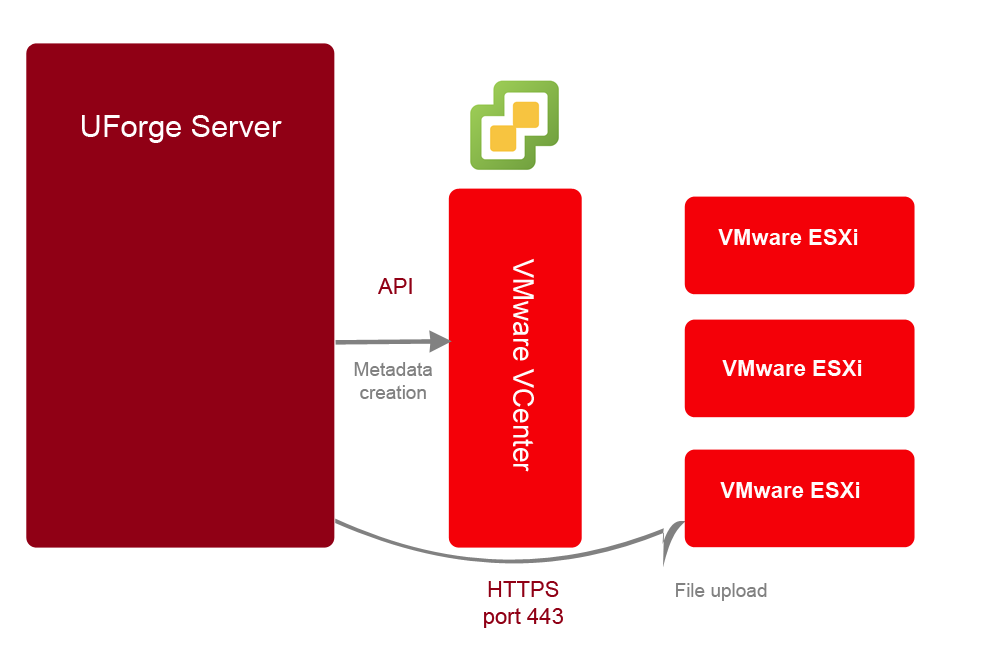
VCenter
Publishing to VMWare VCenter has the following workflow. If your users will publish to VCenter, you should open port 443 in HTTPS.