Configuring Advanced Partitioning
You can configure advanced partitioning as part of your appliance template in the Install Profile. The elements you can configure will depend if your template is Linux or Windows based.
Advanced Partitioning for Linux
The following example assumes that you want to build the following partitions, with a virtual hard drive of 20 GB.:
part /boot –fstype=ext4 –size=500 –ondisk=sda
part pv.1 –grow –size=1 –ondisk=sda
volgroup ROOTVG –pesize=4096 pv.1
logvol / –fstype=ext4 –name=LogVolROOT –vgname=ROOTVG –size=3072
logvol swap –name=LogVolSWAP –vgname=ROOTVG –size=1024
logvol /usr –fstype=ext4 –name=LogVolUSR –vgname=ROOTVG –size=5120
logvol /var –fstype=ext4 –name=LogVolVAR –vgname=ROOTVG –size=1024
logvol /home –fstype=ext4 –name=LogVolHOME –vgname=ROOTVG –size=5120
logvol /tmp –fstype=ext4 –name=LogVolTMP –vgname=ROOTVG –size=1024
logvol /opt –fstype=ext4 –name=LogVolOPT –vgname=ROOTVG –size=1024
- To set advanced partitioning for an appliance template:
Select the appliance you want to modify.
From the
Stackpage, click onInstall Profilein the toolbox.Select
Partitioning, thenAdvanced Partitioning.Note
In order to view the information more easily, you can click on the enlarge button in the top right. This opens a separate window where you will see all the advanced partitioning.
Advanced partitioning works sequentially, from top to bottom. The three sections offered by the UI, which are
Disks,Logical Groups, andLogical Volumesshould be filled in order, sequentially:- disks with partitions including the total virtual disk size required
- logical group(s), assigning the associated physical extent (partition)
- specify the logical volume specification for the created logical group(s)
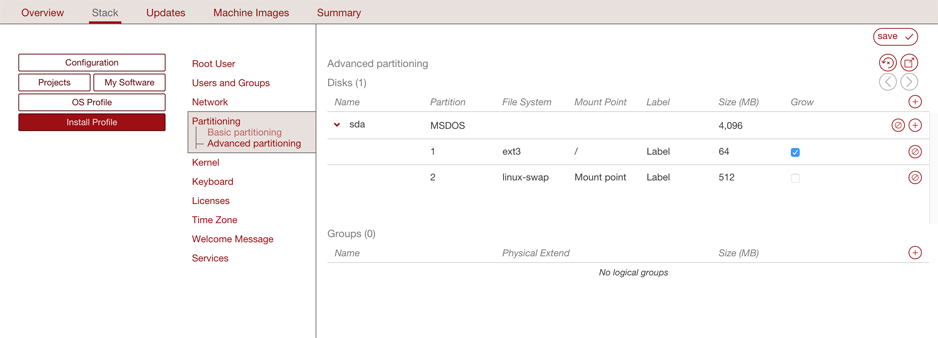
Click on the arrow in
Disksnext to sda. You will see the default disks.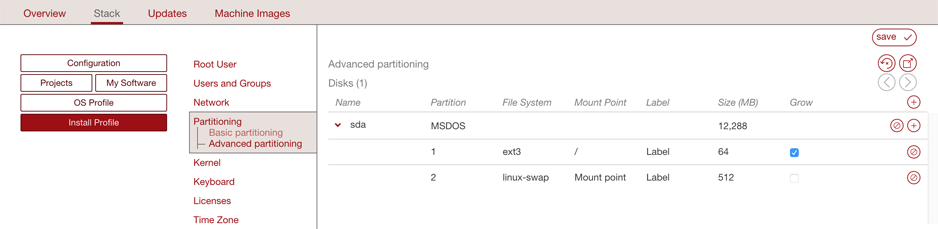
Delete the default
linux swappartition by clicking the x at the end of the line withlinux-swap. You must not set the swap size to 0.Click on the size of the
MSDOSpartition to set it to20000.Click on the partition 1 information to modify the file system to
ext4and the mount point to/boot.Click on the + sign to create a new partition with type
lvm2and size set to18000 MB.Unselect
Growand set the size of the/bootdisk to500.In the
Logical Groupssection, click on the + sign and set the name of the logical group. For this example:ROOTVG.
Note
Image generation will fail when migrating if the volume group name set in the Partitioning Table is the same as the name of LVM volume group in UForge server.
Next to the newly created volume group, click on the + sign to create a new volume extent. A pop-up window will appear proposing a
sda/2physical extent with size automatically set to18000 MB. Clickok.
Create the logical volumes one by one, or create them all at once and then edit the respective specifications. For each logical volume to create, click on the + sign in the
Logical Volumessection. For our example, you will need seven logical volumes.- LogVolROOT ext4 / 3072
- LogVolSWAP linux-swap 1024
- LogVolUSR ext4 /usr 5120
- LogVolVAR ext4 /var 1024
- LogVolHOME ext4 /home 5120
- LogVolTMP ext4 /tmp 1024
- LogVolOPT ext4 /opt 1024
Click
Save.
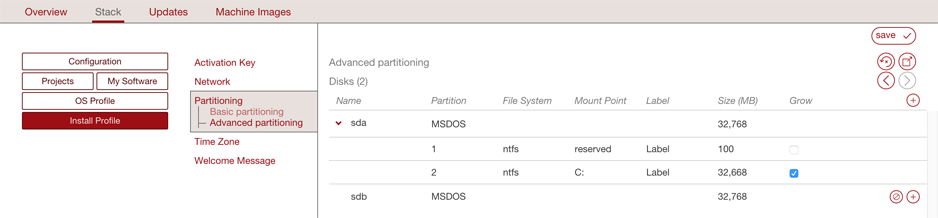
Advanced Partitioning for Windows
You can set an advanced partitioning table for a Windows-based appliance template. To set advanced partitioning:
Click on
Partitioningand selectAdvanced PartitioningClick on the green + sign at the top.
You can modify the name and partitions type
Select the filesystem to
ntfsand mount point, for example:D:.Enter the size. The install disk should be at least
14 Gbfor core versions and20Gbfor full versionsCheck the box in the
Growcolumn if you want the partition to be growable.Click
save.